Accessibility and
the accessibility options dialog box
As you know, a computer functions with
both input (keyboard and mouse) and output (monitor and printer) devices.
In this lesson, we’ll focus on hoe how Windows XP allows you to configure your
computer’s input and output behaviors to accommodate people with range of
disabilities.
To access the
accessibility options dialog box:
1.
Open
the control Panel.
2.
Click
the Accessibility Options link.

3.
The
Accessibility Options window opens.
4.
Under
pick a Control Panel icon, click the Accessibility Options link.
5.
The
Accessibility Options dialog box opens.
Adjustment the
keyboard
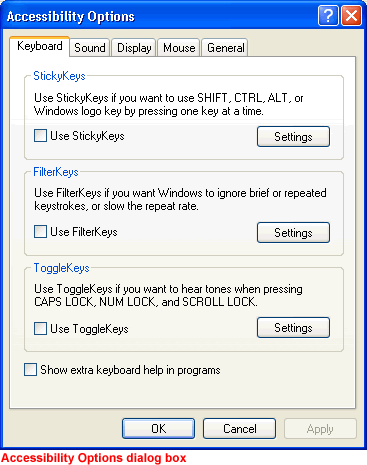
When you open the Accessibility
Options dialog box, notice that is equipped with five tabs: Keyboard,
Sound, Display, Mouse and General.
The Keyboard tab allows you to
change the way your keyboard inputs information into Windows XP.

These features
are especially helpful for users who have difficulty using the keyboard:
▶ Sticky keys: Enable Sticky Keys so you don’t have hold down
several keys at once on the keyboard. For example, if you want to use Control
+ Alt + Delete, Sticky Keys allows you to press one key at a time rather
than having to hold them down all at once. To use Sticky Keys, check the Use
Sticky Keys box and click the Settings button to adjust your
personal settings. Once you enable or disable these, you can use them by
pressing the Shift five times in a row.
▶ Filter Keys: Enable Filter Keys to ignore brief or
repeated keystrokes. To use Filter Key, click the Use Filter Keys box
and click the Settings button to adjust your personal settings.
▶ Toggle Keys: Enable Toggle Keys if you want to hear tones
when pressing CAPS LOCK, NUM LOCK and SCROLL LOCK. To use Toggle keys, click
the Use Toggle Keys box and click the Settings button to adjust
your personal settings.
Adjusting the
Sound
The Accessibility Options Sound Tab
allows you to enable Windows sounds to help you operate Windows XP.

These features are
helpful for users who are hearing impaired. Choose form two options:
▶ SoundSentry: Windows XP uses sound to alert users to
certain warnings or notices. SoundSentry enables these warning to appear on
your screen instead of as a sound. To use SoundSentry, click the Use
SoundSentry check box. Then choose the kind of visual warning you want to
receive.
▶ ShowSounds:
Use ShowSounds to tell any programs to show text for any sounds or speech them
may use. To use ShowSounds, click the Use ShowSound check box.
Adjusting the display
The Display tab allows you to
use high-contrast colors and adjust the cursor to make reading
easier.
These features
are helpful for users who are visually impaired. Choose from two options:
▶
To enable High Contrast, click the Use High Contrast check box.
Clicking the Settings button enables the shortcuts for High Contrast.
▶
Use the sliders to change the cursor blink rate and width of the cursor.
Using MouseKeys
The Mouse tab allows you to use
the numeric keypad on your keyboard to control the pointer. To use MouseKeys,
click the Use MouseKeys check box. Clicking the Settings button
enables the shortcut for MouseKeys, LEFT ALT+ LEFT SHIFT + NUM LOCK.

The General tab
The General tab provides
additional accessibility control options.

▶ Automatic reset: If accessibility features are turned on,
users can turn off accessibility features after being idle for a specific
period of time. Use the drop-down menu to select the desired time.
▶ Notification: Receive a warning when turning a feature on,
or make a sound when turning a feature on or off.
▶ SerialKeys:
Turn on SerialKeys so other input devices (other than the traditional keyboard
and mouse) can work with Windows XP.
▶ Administrative options: Computer administrators can apply all
accessibility options to the log on the desktop and apply all accessibility
settings for each new user.


